
Introduction
DW-DALI2 Module Installation Manual describes the procedure for its installation, assembly, operation and setting. While working with the module, you must strictly comply with all the requirements set out in this manual. Failure to comply may result in damage to the device, its failure, electric shock, fire and other fallout.
Features
- Automatic line scanning for new devices
- Built-in bus power injection
- Dali device configuration
CAUTION! All work related to the installation, connection, setting up, service and support must be carried out by qualified personnel with sufficient skills and experience in working with electrical equipment. To avoid the risk of fire, electric shock, damage to the system and/or personal injury, the system installation and assembly must be performed in accordance with the instructions listed below:
- all connectivity work must be carried out with the power turned OFF;
- use appropriate tools and personal protection against electric shock;
- do not use damaged cables, wires and connectors;
- avoid folding the cables and wires;
- do not apply excessive force to the wires by kinking or pressing them too hard: the inner conductors of the cables and wires may get stripped or damaged;
- do not use the power socket with poor contacts to connect;
- do not exceed the load limit parameters specified in the manual;
- the supply conductors wire section is subject to the specifications for current density limit, insulation type and wire material. Light section can result in cable overheating and fire.
When the power is on, NEVER:
- connect/disconnect the connectors;
- open modules and sensors.
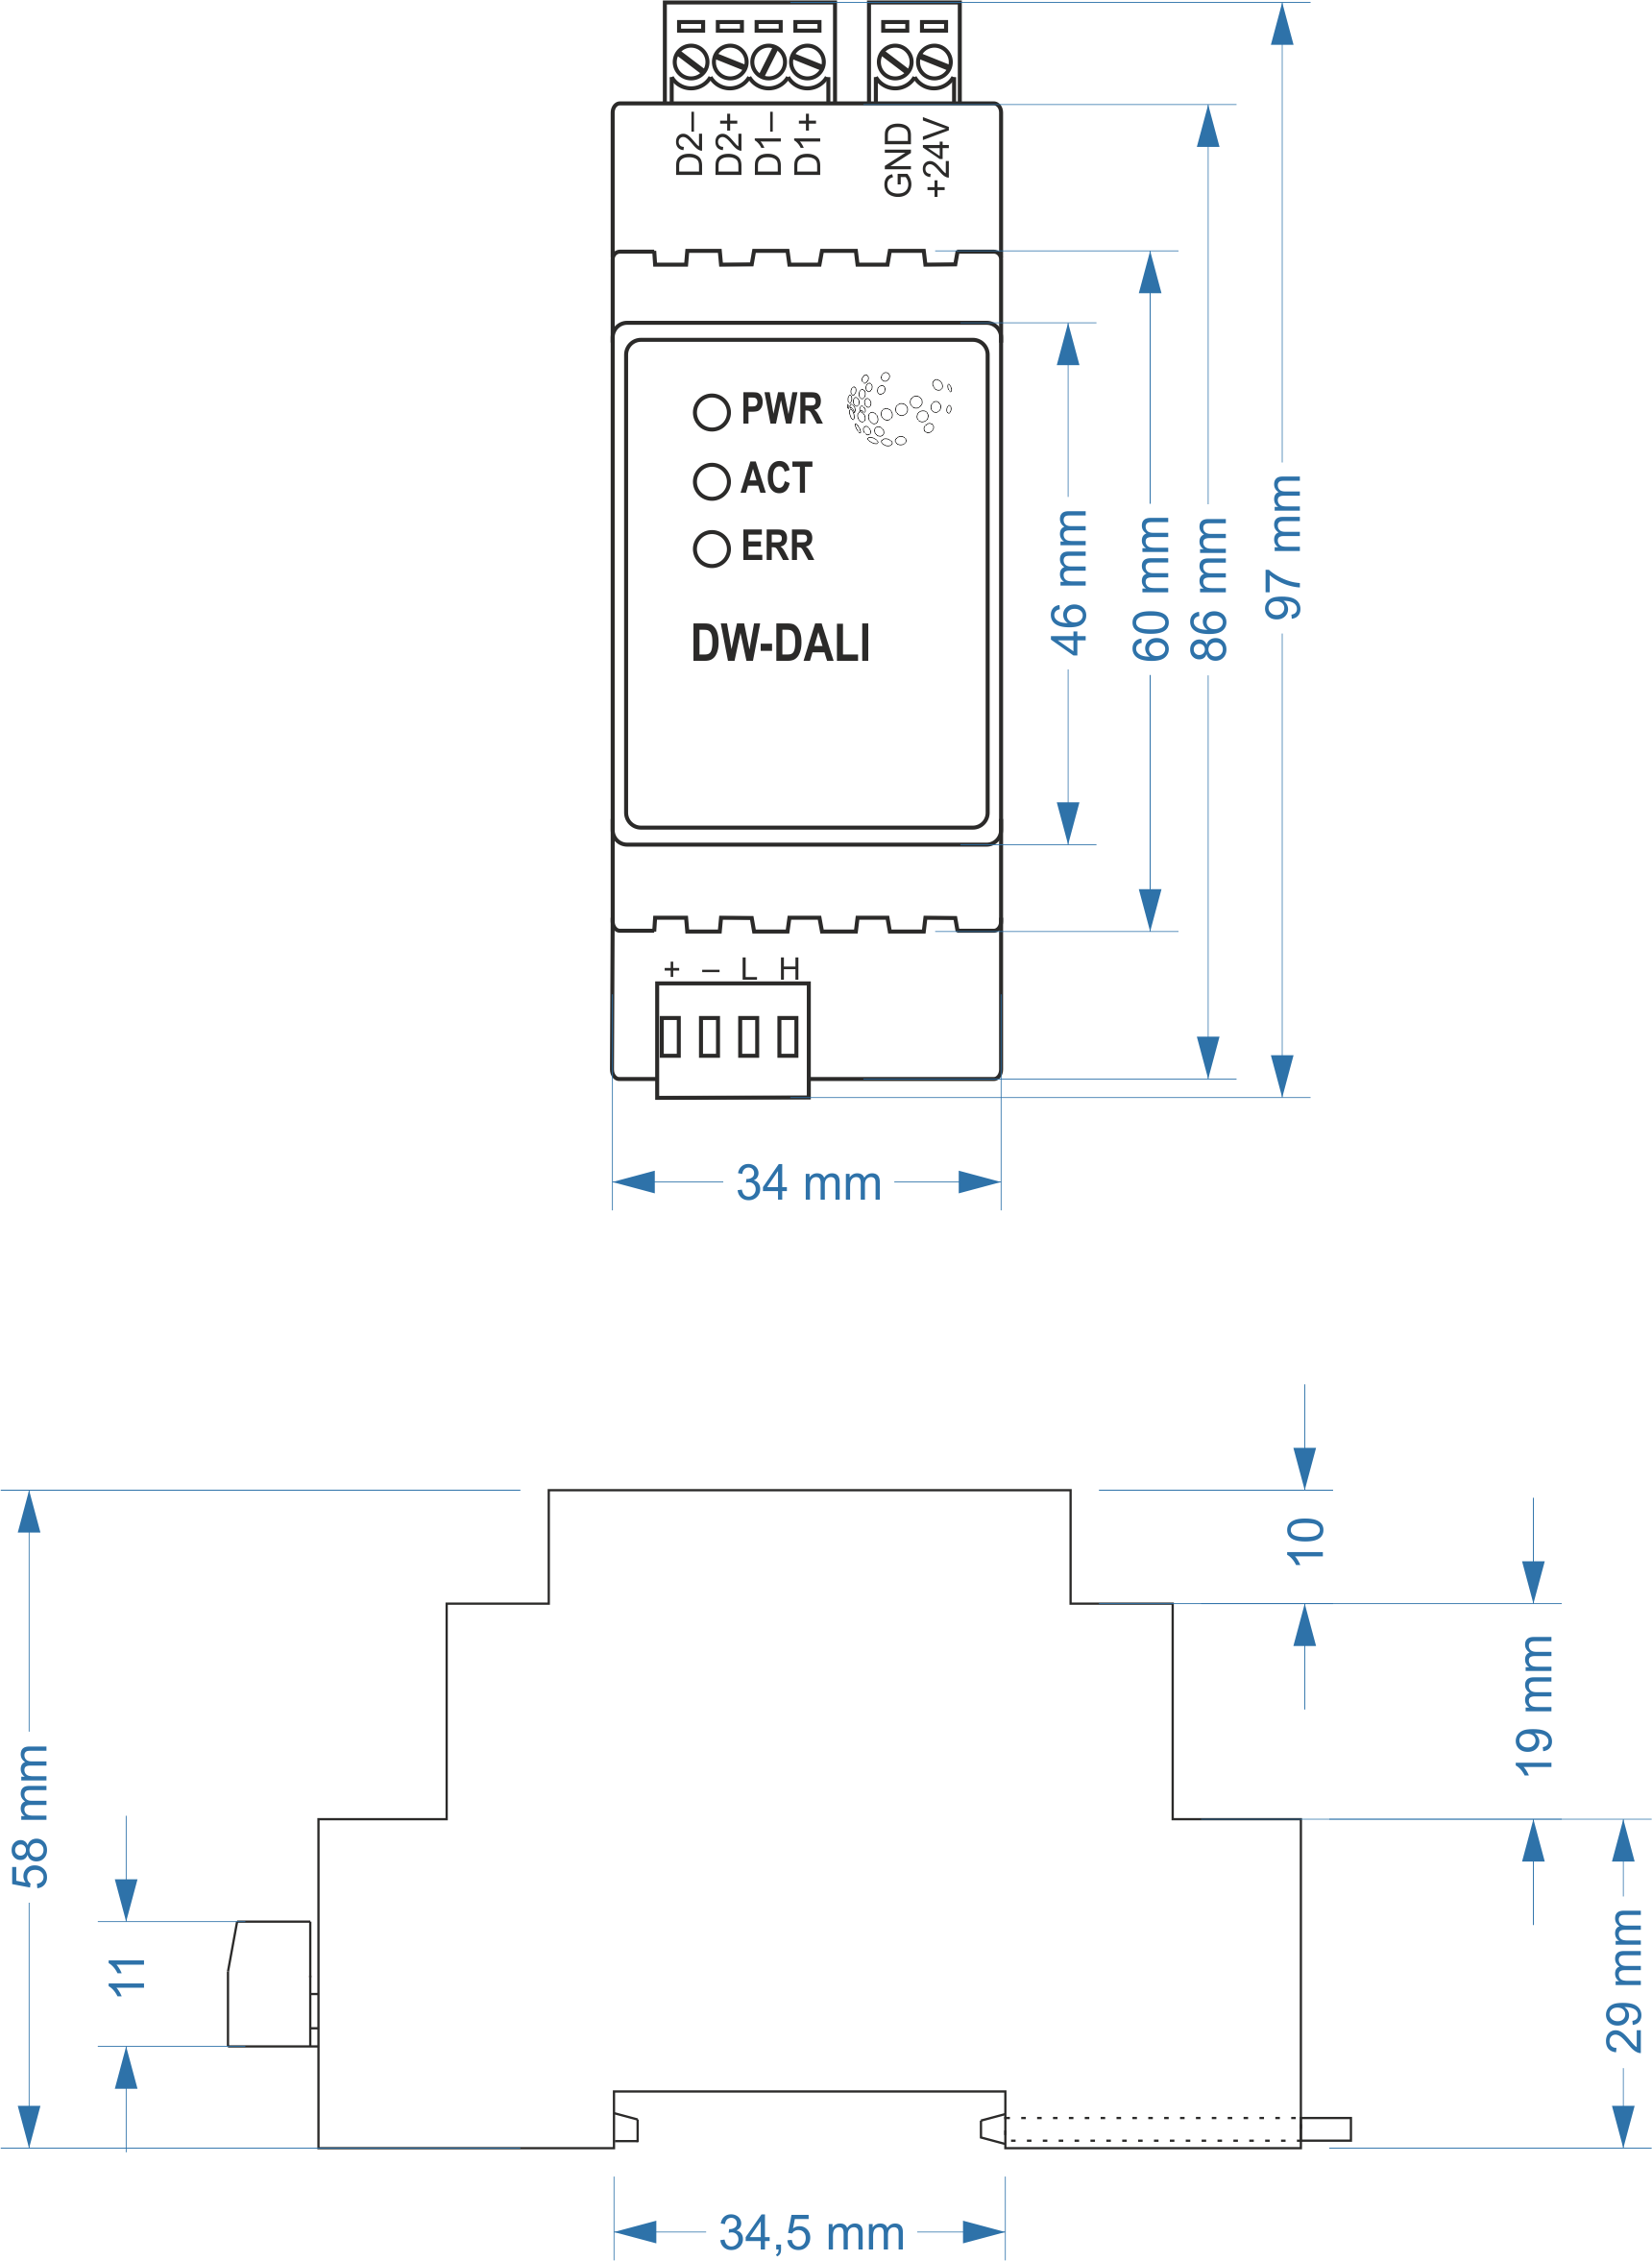
Module dimensions
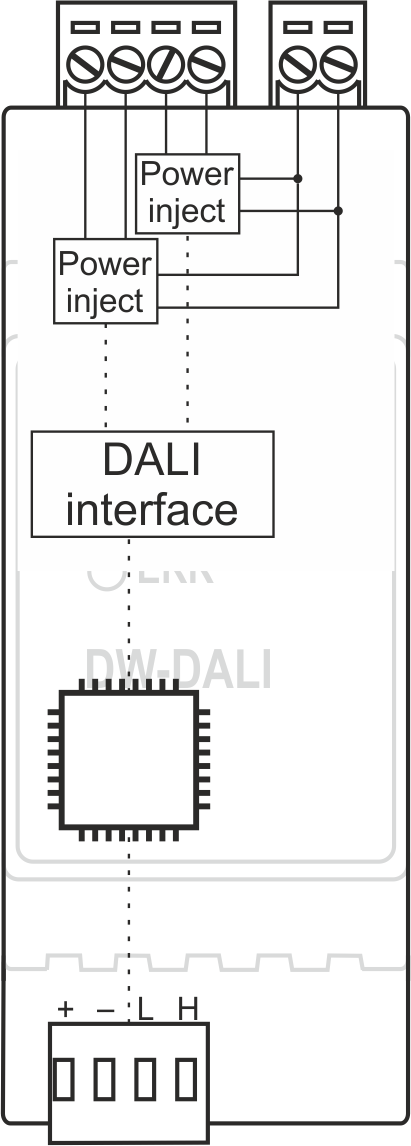
Internal layout
Module configuration and correct use
Module correct use
DW-DALI.A module is to be used as a part of a wired system Larnitech Smart House. DW-DALI.A is to be used for data exchange between devices connected to the CAN bus, and devices such as electronic ballasts and dimmers, supporting DALI (Digital Addressable Lighting Interface) interface.
Scope of supply
The scope of supply is as follows:
| Parameter name | Value |
|---|---|
| DALI ports qty | 2 |
| DALI-line voltage supply | 10.5 – 22.5 V DC |
| Peak current of DALI-line power supply | 1A |
| Peak current in DALI-line | 300 mА |
| Maximum DALI devices quantity | 641 |
| Power supply | 11.5 … 27.5 V DC from CAN |
| Max current(24V) | 30 mA |
| Bus type | CAN (4-wire) |
| Equipment installation type | DIN rail (EN 60715) |
| Case material | ABS |
| Protection | IP40 |
| Temperature range | -10 … +50 °C |
| Size | 2U, 35x97x58 mm |
| Weight | 75g |
Module general structure
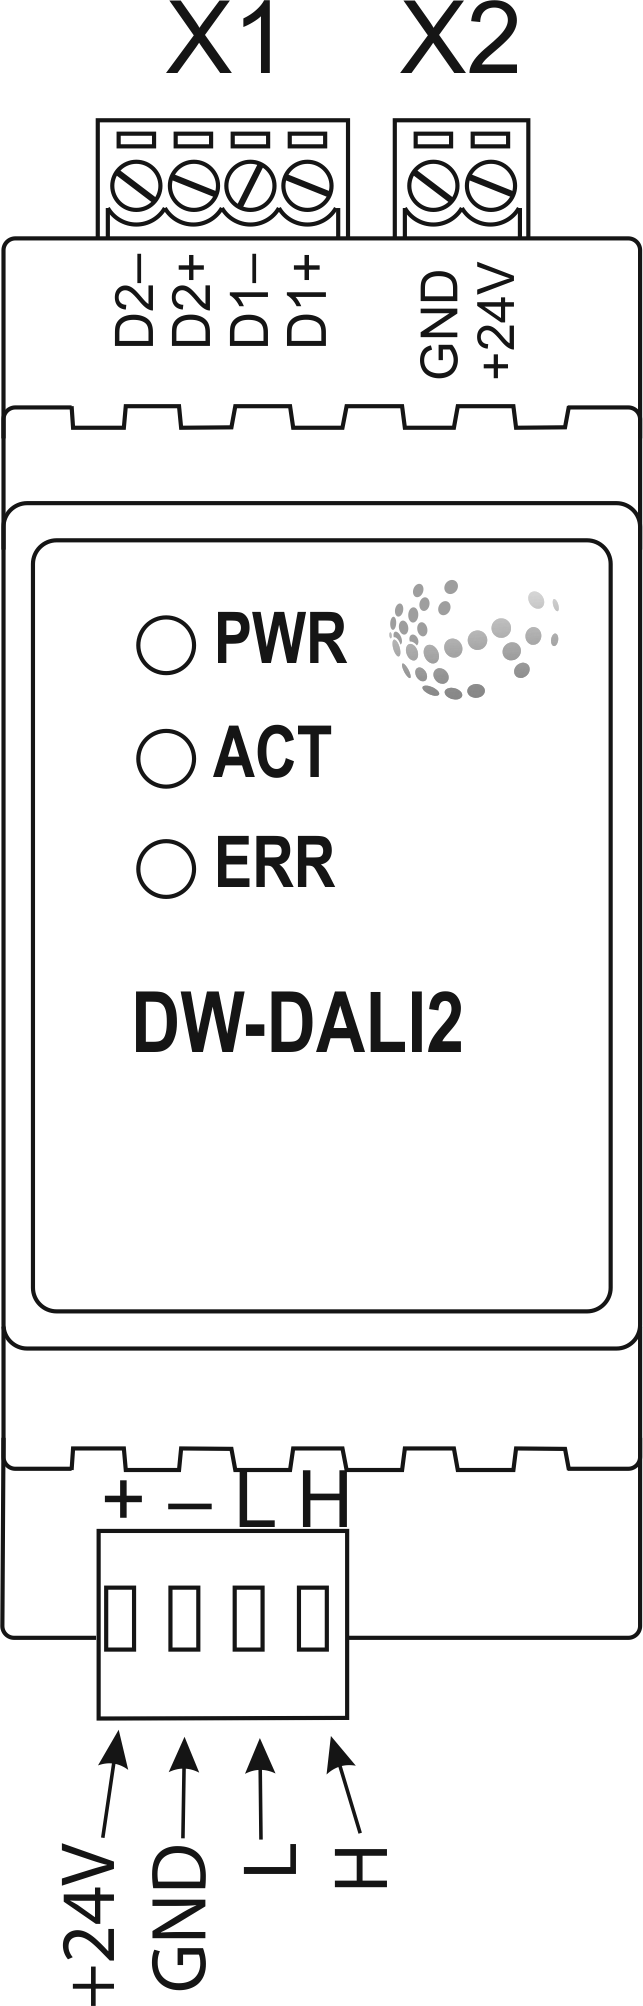
At the bottom of the casing there is a connecting plug (3) to the CAN-bus of Smart House network.
The physical configuration and contact point assignment of each connector are shown in table
| Connector | Contact | Assignment |
|---|---|---|
1 DALI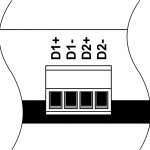
|
D1+ D1- D2+ D2- |
DALI1 bus DALI2 bus |
|
2 DALI power supply
|
+24V GND |
+24V — DALI bus power supply GND — common |
|
3 Module indicating unit |
The scenario for module indicating unit is shown below | |
|
4 CAN
|
VCC GND L H |
VСС — +24V power supply of CAN-bus GND — common L — CAN-L data bus H — CAN-H data bus |
| Indicator | Status | Description |
|---|---|---|
| Power |
|
Power |
|
|
Power not available | |
| Activity |
|
Data communication |
|
|
Data communication not available | |
| Error |
|
No errors |
|
|
Overheating | |
|
|
The data has not been transferred via the CAN bus for at least 5 minutes. | |
|
|
No power on the DALI bus or over current (more then 180 mA) on DALI bus. If over current is at both bus blinking twice in half a second. |
Module installation and assembly
Before connecting the module, you must determine the module installation place. Note: The module must be installed near 24V power supply.
Typical diagram for DW-DALI.A module connection 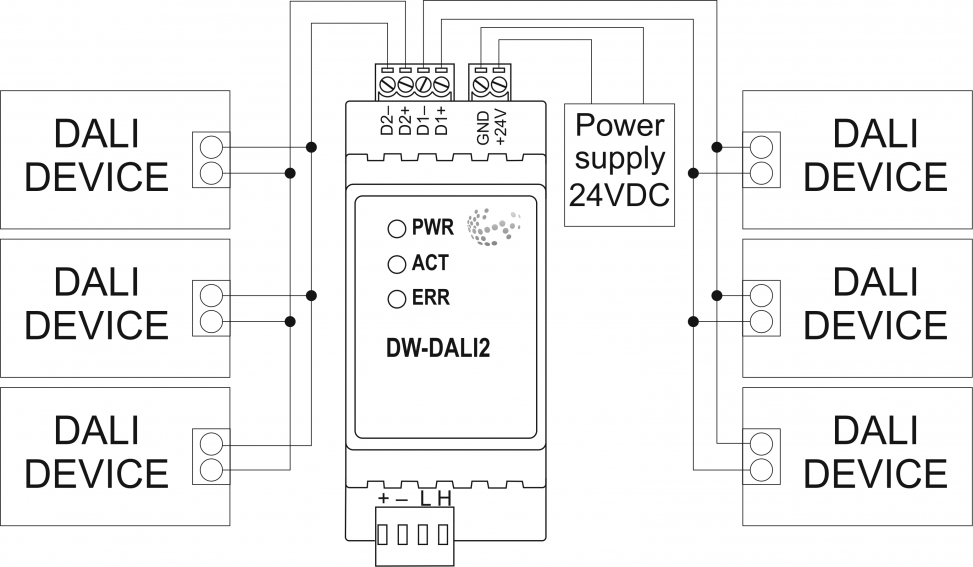
Module installation and connection procedure
CAUTION! You must precisely follow the recommendations listed in the «Safety Requirements» section of this manual.
- Install the module in the switchboard on the DIN-rail and secure it with special latches available on the module base.
- Connect the CAN-bus (4).
- Connect the DALI-bus (1).
- Connect the DALI power connector (2).
- Energise the module power supply (24 V).
Module shutoff and disassembly procedure
- isconnect the power connector (2).
- Disconnect the DALI connector (1).
- Disconnect the connector of CAN-bus (4).
- Demount the module from the DIN-rail, releasing the latch, available at the module base.
Чтобы приобрести понравившийся товар, необходимо его заказать. Есть несколько сценариев того, как это можно сделать.
- Выбрать понравившийся товар и нажать кнопку «Заказать». При оформлении заказа заполнить форму. Вписать информацию в поля: ФИО, телефон и e-mail. Затем вам перезвонит менеджер, чтобы подтвердить ваше согласие на совершение покупки.
- Выбрать понравившийся товар и нажать кнопку «В корзину». Затем перейти в корзину и нажать «Оформить заказ». Далее заполнить форму с контактными данными и отправить заявку. С вами свяжется менеджер для дальнейшего обсуждения.
- Перейти в карточку товара и нажать «Купить в один клик». После нажатия нужно заполнить форму и отправить заявку. С вами свяжется менеджер для дальнейшего обсуждения.
Мы работаем с физическими и юридическими лицами. И предоставляем сразу два варианта оплаты.
- Наличные. Вы подписываете товаросопроводительные документы, расплачиваетесь денежными средствами, получаете товар и чек.
- Безналичный расчет. Принимаем карты Visa и MasterCard. Доступен при курьерской доставке.
Ваш заказ можем доставить собственными ресурсами, при условии вашего нахождения в городе. Либо через 4 варианта доставки:
- Курьерская доставка. Курьерская доставка работает с 9:00 до 19:00. Когда товар поступит на склад, курьерская служба свяжется для уточнения деталей. Специалист предложит выбрать удобное время доставки и уточнит адрес.
- Самовывоз из магазина. Для получения заказа обратитесь к сотруднику в кассовой зоне и назовите номер.
- Сотрудничаем с постаматами. Срок хранения — 3 дня.
- Предоставляем почтовую доставку через почту России. Когда заказ придет в отделение, на ваш адрес придет извещение о посылке. Вскрывать коробку самостоятельно вы можете только после оплаты заказа.
Для корректного подбора оборудования обращайтесь к нашим менеждерам для получения консультации. Мы с радостью обсудим с вами ваш проект и подберем оптимальную конфигурацию.
Наши специалисты могут выехать на ваш объек, чтобы проконсультировать на месте.
123